Another Watering Question

OldGuy43

Garden Ornament
Joined
Nov 15, 2011
Messages
693
Reaction score
14
Points
90
Location
Travis County, Texas Zone 8b
When using a soaker hose on your newly seeded garden do you put the hose on top of the row and move it later as the plants start to sprout or do you put it between the rows?
 

NwMtGardener

Garden Addicted
Joined
May 30, 2011
Messages
1,839
Reaction score
874
Points
227
Location
Whitefish, MT
Another garden question to answer with: it depends! Some people actually bury their soaker hose, then seed over it...i'm wondering if in texas that might not be a good idea for you, oldguy. I dunno that much about texas gardening though, just thinking about the drought and water conservation.

I like to snake my soaker hose all the way around my tomatoes...so that it forms a whole circle way out around the plant. I just lay mine on the surface of the dirt, and use some tent stakes or something like it to keep it in place. When its something like lettuce, i just run it right through the middle of the plants, anddont really worry about it that much. If it ends up interferring with one of theplants, the plant will usually just grow around it. BTW, i dont really do rows like other people, more like just mass plantings, so i dont have the option of running the soaker down between the row. I would think that would be the least effective, and the most wasteful of water.
 

majorcatfish

Garden Master
Joined
Jan 27, 2013
Messages
6,869
Reaction score
11,342
Points
377
Location
north carolina
nwmtgardener, your the only person who has ever mentioned that;)
with a loop around your tomato's, you will get great root development. been do this for a couple years now.
we use pipe cleaners to make the loop, no staking needed.


as for seedlings place the soaker 3"-4" away from them as they grow move the soaker away again.


as for planting seeds will place the soaker around 3" away from the seeds, a good soaker will keep the soil wet 8" on either side.


with that said.
when you are placing your soakers out you need too think ahead of time what they are going to be watering.
you do not want to have 2 different type of plants that require 2 different watering needs on the same hose.

here there is a separate soaker for each plant needs.
tomato
peppers
beans/cucumbers
etc

at the end of the season coil up your hoses, place them in a kiddie pool and soak them in a good laundry soap overnight and then pressure wash them to keep them clean.
all my soakers are 10+ years old and work just like new. and yes have to repair over the years as well..
as for burying the hose that's great in a flower bed, just not practical in a vegetable garden.
hope this helps
mc
 

NwMtGardener

Garden Addicted
Joined
May 30, 2011
Messages
1,839
Reaction score
874
Points
227
Location
Whitefish, MT
Great pics to demonstrate, majorcatfish. You brought up a good point i didnt mention. I have 2 soaker hoses for my small garden, as well as an overhead drip system with misters and drippers in specific areas. Each of the soakers, and the overhead drip, is on a separate attachment, so i can regulate the water pressure and amount a bit. I have two of those two-headed nozzle attachment thingies with the adjustments so you can allow a smaller or greater amount of flow to that system. You can also find them with 4 heads, i just use 2 together cause thats what i had. So...if one soaker hose is spraying the leaves of my plants, i can easily turn down the water pressure to that one, or turn it up if i find i'm not covering enough area. I also use a programmable timer at the point where the whole system attaches to the house water, so i can go away and know the plants will still be getting watered.
 

majorcatfish

Garden Master
Joined
Jan 27, 2013
Messages
6,869
Reaction score
11,342
Points
377
Location
north carolina
NwMtGardener said:
Great pics to demonstrate, majorcatfish. You brought up a good point i didnt mention. I have 2 soaker hoses for my small garden, as well as an overhead drip system with misters and drippers in specific areas. Each of the soakers, and the overhead drip, is on a separate attachment, so i can regulate the water pressure and amount a bit. I have two of those two-headed nozzle attachment thingies with the adjustments so you can allow a smaller or greater amount of flow to that system. You can also find them with 4 heads, i just use 2 together cause thats what i had. So...if one soaker hose is spraying the leaves of my plants, i can easily turn down the water pressure to that one, or turn it up if i find i'm not covering enough area. I also use a programmable timer at the point where the whole system attaches to the house water, so i can go away and know the plants will still be getting watered.
do you have pictures of your drip system? would like to see it....
 

so lucky

Garden Master
Joined
Mar 5, 2011
Messages
8,342
Reaction score
4,963
Points
397
Location
SE Missouri, Zone 6
Majorcatfish, what a great looking garden. So neat and orderly. Mine looks like a crazy lady put it in. :hide
 

NwMtGardener

Garden Addicted
Joined
May 30, 2011
Messages
1,839
Reaction score
874
Points
227
Location
Whitefish, MT
Well I'll TRY, the drip system is not that easy to photograph, turns out! I'll try and explain the pics a little...

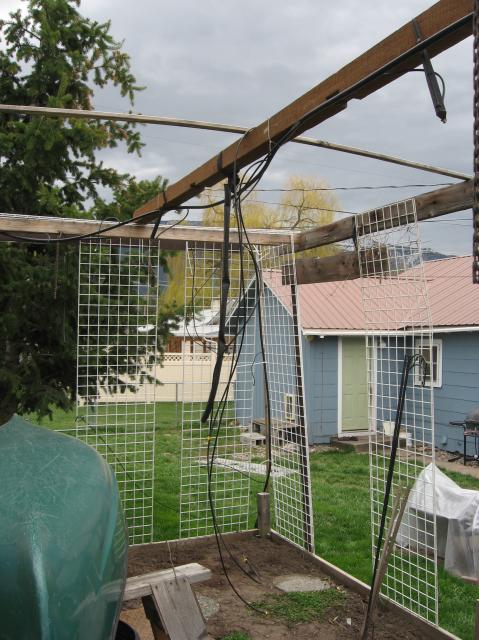
overall look at the garden, without the greenhouse plastic up...didn't have time this spring for it...the drip system runs up from the far corner and snakes around the ceiling of the garden...mostly down the big timber you see in the middle, and has extensions coming off it. The main irrigation hose is 1/2", and you buy this special tool to put holes in it, which you then snap these nipple things in, then attach your extensions. The extension pieces you can make as long as you want, and put whatever end you want on it...they make all kinds.
8229_img_1270.jpg


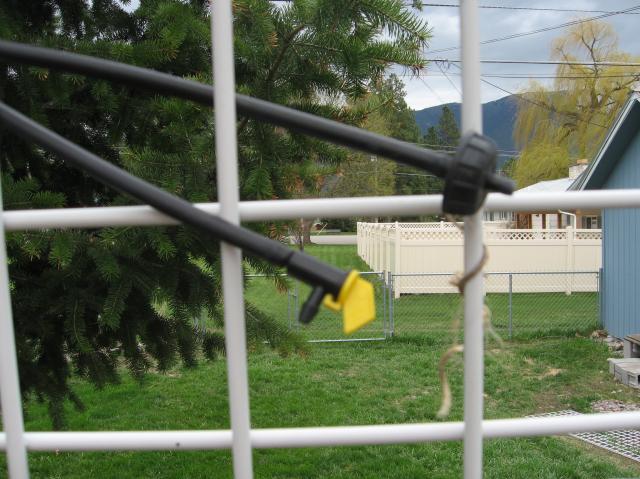
Here's a closeup of two of the ends...the one on top just drips at a specific rate, the one on bottom is adjustable. You can also get mister ends for them.
8229_img_12691.jpg


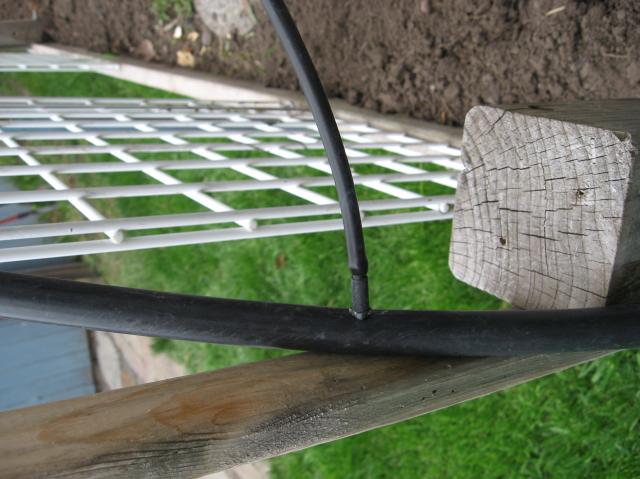
Here's a closeup of that nipple connection I described earlier, from the 1/2" main hose to the little extensions.
8229_img_12681.jpg


It wasn't that hard to put together at all, and not very expensive. Mostly I think it was easy for us to put together because we already had the framework for the greenhouse to work with.
 

majorcatfish

Garden Master
Joined
Jan 27, 2013
Messages
6,869
Reaction score
11,342
Points
377
Location
north carolina
so lucky said:
Majorcatfish, what a great looking garden. So neat and orderly. Mine looks like a crazy lady put it in. :hide
thank you so lucky..like you said my garden looked like the mad hatter planted, soaker hoses running everywhere. you could barely walk in there and hoped you did not step on something while picking. during winter did some reading watched a few shows did some more reading and picked up a few good ideas.
once the 2013 seed porn catalogs came out between the 2 of us we decided to plant some different veggies in the garden, so to plant all of this it would not fit in there so hence the raised beds the 4 that i made are full so i made 2 more yesterday.

yes there is a little wasted space, but in the long run it will make it so much easier to pick and weed. plus with the open design this will help in air movement..
 

majorcatfish

Garden Master
Joined
Jan 27, 2013
Messages
6,869
Reaction score
11,342
Points
377
Location
north carolina
NwMtGardener said:
Well I'll TRY, the drip system is not that easy to photograph, turns out! I'll try and explain the pics a little...

overall look at the garden, without the greenhouse plastic up...didn't have time this spring for it...the drip system runs up from the far corner and snakes around the ceiling of the garden...mostly down the big timber you see in the middle, and has extensions coming off it. The main irrigation hose is 1/2", and you buy this special tool to put holes in it, which you then snap these nipple things in, then attach your extensions. The extension pieces you can make as long as you want, and put whatever end you want on it...they make all kinds.
http://www.theeasygarden.com/forum/uploads/8229_img_1270.jpg

Here's a closeup of two of the ends...the one on top just drips at a specific rate, the one on bottom is adjustable. You can also get mister ends for them.
http://www.theeasygarden.com/forum/uploads/8229_img_12691.jpg

Here's a closeup of that nipple connection I described earlier, from the 1/2" main hose to the little extensions.
http://www.theeasygarden.com/forum/uploads/8229_img_12681.jpg

It wasn't that hard to put together at all, and not very expensive. Mostly I think it was easy for us to put together because we already had the framework for the greenhouse to work with.
nice set up you have there, will have to look into this for my raised beds next year...
 

Collector

Garden Master
Joined
Sep 16, 2010
Messages
3,026
Reaction score
3,852
Points
337
Location
Eastern Wa. Zone 5/6 ?
NwMtGardener said:
Well I'll TRY, the drip system is not that easy to photograph, turns out! I'll try and explain the pics a little...

overall look at the garden, without the greenhouse plastic up...didn't have time this spring for it...the drip system runs up from the far corner and snakes around the ceiling of the garden...mostly down the big timber you see in the middle, and has extensions coming off it. The main irrigation hose is 1/2", and you buy this special tool to put holes in it, which you then snap these nipple things in, then attach your extensions. The extension pieces you can make as long as you want, and put whatever end you want on it...they make all kinds.
http://www.theeasygarden.com/forum/uploads/8229_img_1270.jpg

Here's a closeup of two of the ends...the one on top just drips at a specific rate, the one on bottom is adjustable. You can also get mister ends for them.
http://www.theeasygarden.com/forum/uploads/8229_img_12691.jpg

Here's a closeup of that nipple connection I described earlier, from the 1/2" main hose to the little extensions.
http://www.theeasygarden.com/forum/uploads/8229_img_12681.jpg

It wasn't that hard to put together at all, and not very expensive. Mostly I think it was easy for us to put together because we already had the framework for the greenhouse to work with.
This is the system we started using last year, the best system we have ever used. It is easy to install and no end to the configurations you can put together. We run the soaker lines off it for row type crops, drippers on the things like tomatos, blueberries, squash, really anything with wide spacing. You can get drippers with different flow rates so you are not over or under watering anything which is great. DW also put in a few misters for her flowers that like it. We have around 300' of soaker line 20 drip heads and 4 mister running off of the 1/2" trunk line now, I know it can take a lot more though. This stuff is easy to work with, and easy to change configurations when needed. The best part of it is once your plants get going you are pretty much done weeding because you are not watering anything but the plants. All we need now is a timer and we are totally set up.
 

Latest posts

Top